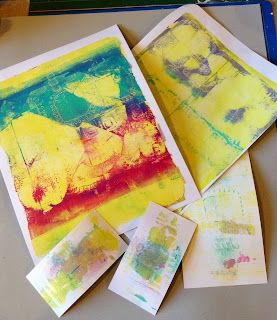
I wanted to make a gift set of wrapping paper, greetings card and tag, so I knew I was heading towards making a masterboard using the Gelli plate. I had a lot of fun playing with all my favourite Fresco Chalks on the Gelli plate, using a Birgit Koopsen technique of stamping into the paint to create patterns and designs before taking off a print.
I played around with lots of colours, making lots of gorgeous prints and patterns (which I was able to use later) but finally decided on this combination: Bougainvillea and Captain Peacock - what else!
Here are some of the prints I pulled which I made into various greetings cards and tags.
During the 'Play' stage of this project I spent a wonderful day with my daughter and two little Grandfairies in the Cotswolds, at Bourton on the Water. We ended the day with a 'fish and chips' supper in the garden of a lovely little café where our bread was served in a small, white, take-away box. Ever watchful for a craft product, I seized this box realising it would make a perfect gift box for mini cakes or cookies. Perfect for this project! So, on my return, I set about deconstructing the box in order to transfer the stamped pattern from the Gelli plate onto the outside of the box. No easy feat, I can tell you. but, I persevered and voila!
I didn't mind that there were some white spaces where the paint didn't quite catch as I'm not very good at leaving white space on a project so I was pleased with this serendipitous result. Now, in order to bring the stamped pattern forward, I used Ranger black Archival ink to overstamp the larger of the stamped images.
Further stamping and embellishing with a white, uniball signo pen completed the design on the outside of the box.
I painted the reverse completely with Captain Peacock, used Ranger Blue/Violet Archival and a mix of Emma's stamp sets to create a repeated pattern to decorate what would become the inside of the box.
Now I had only to reassemble the box for this part of the set to be complete.
I used the masterboards I had previously created on the Gelli plate to make a Greetings card and tag and the Gift set was complete.
Some raspberry cookies, pink tissue paper and coloured wool was all I needed then for the gift to be ready for a friend who despite being unwell hosted a lovely barbeque recently. I had great fun creating lots more cards and tags for my 'stand-by drawer' and still have lots left over for art journaling and ATCs.
These are the stamps and paints I used for the final projects. Thankyou so much for dropping by. I do hope you will have a go with this Gelli plate technique for creating patterns and of course use Emma's gorgeous stamps at the same time!
Now I need to decide what to do with these beauties created when I cleaned the brayer as I switched colours. Delicious.
Bye for now and happy crafting!


fabulous to see more of the process of this project, Chris. I really love it, as I said at PA. You'd never think the box once held fish and chips.
ReplyDeleteI know! Transformed. Thanks Helen for all your comments tonight. You are so kind! 😙
DeleteGorgeous. Just gorgeous. x
ReplyDeleteThanks Wendy! Xxx
DeleteFantastic make Chris and great to see you've had the gelli plate out xxx
ReplyDeleteOoh yes! I love my Gelli plate. Thanks Sam! You are always so encouraging.
Deleteoh wow those are fabulous !!!!!!!!!!!!!! love every single effect, great job ! inspiring! Marta xx
ReplyDeleteYou are very kind Marta. Thank you xxx
DeleteChris these are all totally fabulous! x
ReplyDeleteThank you Helen xxxx
DeleteReally gorgeous Chris.
ReplyDeleteThanks Angie.
DeleteWow I absolutely love this, it's gorgeous love it the colours xx
ReplyDeleteThanks Julie!
Delete