Words I will journal by.
Create. Learn. Try. Believe you can.
Sunday, 20 August 2017
Book-in-a Box 3
Hi everyone, as promised here is my final step by step, explaining how I completed this project for the PaperArtsy blog challenge, which unfortunately ends tonight. There have been some fabulous creations during the past fortnight which I'm sure has inspired many crafters to make their own books! Have a look at them here.
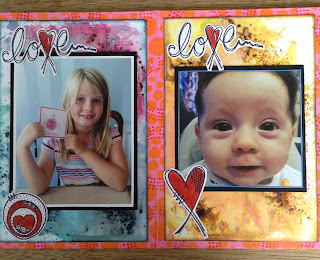
Once I had completed the box cover and the back of this concertina booklet, I was able to get on with the main reason for making it. I chose photos of all five granddaughters to cover each 'page' of the booklet. It would be too fussy to create a background for the photos in the same way as I had completed the box and reverse of the booklet, so I decided to get out the Ranger Oxides and PaperArtsy Infusions to create some backgrounds to mount the photos on. PaperArtsy Infusions are available in many colours here.
I used various colours and used Tim Holtz's swoosh technique i.e. Squidge some of the oxides across a craft mat, then spray with water and dab some paperArtsy Smoothy 240gms card through the watery ink. It's best to dry your first inky smears before adding more colours. Always remember to dab rather than swoosh though to get the best effect. The original Distress inks are great for swooshing, these are best if you dab! Another language isn't it? I'm no expert with these Oxides or very proficient with the dab technique, but I was successful enough to be able to choose seven that would be useful for the booklet pages. However, I wasn't finished yet.
I decided to add some of the gorgeous PaperArtsy Infusions on top of this base layer of Oxides. There are so many colours now to choose from. I selected colours that would complement the Oxides. In my post on the PaperArtsy blog I have explained which colours I chose. Have a look here. My post was blogged last Friday. There are several ways to use the Infusions but I used the technique where I lightly sprayed over the Oxides with water, then sprinkled a very small amount in the areas I most wanted to cover. I avoided the middle as that is where I would place the photos.
Before mounting the background papers to the booklet, I painted around the edges with Fresco Bubblegum, and stencilled over that with Fresco Tango through a PaperArtsy stencil. I then mounted each photo onto black card before positioning each one on the seven pages in the concertina booklet.
My final step was to use some of the gorgeous stamped images from Tracy Scott's sets from PaperArtsy (again these are shown on the PaperArtsy blog) and place these around each photo. I will add journaling later. So there we have it. My completed Book-in-a Box which I have loved making and will be displayed on the bureau in the Dining room for all to see. Thankyou so much for joining me, especially if you have visited the three posts explaining how I made this project. Until next time...
Subscribe to:
Post Comments (Atom)


it's been great seeing how your gorgeous creation came together, thanks for sharing the process!
ReplyDeleteThank you Helen xxxx
DeleteThis is such a fabulous book! The background really draws attention to the sweet photos. Well done! Hugs, Autumn
ReplyDelete