Words I will journal by.

Create. Learn. Try. Believe you can.

Wednesday 24 August 2016

Artful Days: By The Sea project 2

Hi everyone,

My post tonight is my second project for this month's Artful Days Goodie box. I'm flattered and delighted to have been accepted onto Julie Bell's design team for her monthly Goodie boxes which you must know by now are just gorgeous for Mixed Media artists, scrap bookers, art journalers and card makers. The contents of this month's box are so wonderful that I just can't stop making things with them. Hence a second post this week! Tonight I'm posting my 'Mini tin Collage'. I do hope you like it. I had great fun making it.
The tin that I used was a discarded Caran D'Ache Neocolours 11 tin. I have so many of these crayons that I now have them all in a jar on my craft table. Once I knew the size of each side of my tin: 4 and 3/8" by 5 and 3/8", I could select a couple of papers for the backgrounds and cut them to size. However, before I glued anything down I planned and arranged the 'pictures' I wanted to create first.  I 'fussy-cut' a wonderful, typically quirky focal image from one of the beautiful Graphic 45 sheets, cut out some bunting, then selected and cut out some of the sentiments that can be found on several of the sheets. Together with the gorgeous light wood lighthouse and various ephemera, I was ready to start gluing and layering everything in place. There is so much to choose from. Great fun. 
Before I did any gluing, I inked all the edges, even the lighthouse. I didn't want to paint this as it fitted the colour theme so well as it was.  However, I did have to come up with a way of creating the light from the lighthouse. 
Just two little triangles did the job nicely: simple! The lace is not actually included in the Goodie box but it's the only item I added; a lovely piece of vintage lace from my stash. In an attempt to create a wavy sea, I used the piece of denim (which is an added 'freebie' this month) to cut a wavy strip from. I'm really chuffed with how this turned out. It was just trial and error. I put a few folds in and stapled them to create the effect. Love it. Now, all I had to do was add the focal image, sequins, shells (you get tons, all different sizes) gems and other ephemera to complete the scenes. I can't tell you what fun I had 'playing' with all this lovely stash. Julie has hunted down some beautiful, top quality items, almost too beautiful to use. And, of course, because everything complements the theme, it is very easy to build a scene in no time. The hard work has been done for you. 


You can see here how I just kept adding bits and bobs to the scenes until I was happy. Don't you just love that little string of blue beads? That glittery sun is beautiful too. The amber gem in the middle gleams when a light shines on it. Delicious. All it now needed was some doodling! 
And there we are! I'll leave you with a close up of both sides of the tin which is now sitting on the bureau in the dining room catching the afternoon light.  I hope you like it too.  If you love the items I used why don't you pop along to the website and order your own, Here
If you are interested, you can see more photos of this project with more details of how I made it over on the Artful Days blog, Here together with more projects made by Julie and the team.

Thankyou so much for stopping by. See you again soon! 


Monday 22 August 2016

August Goodie Box from Artful Days!

Hi everyone! Hope you are all well and enjoying your crafting.

I'm back tonight with a sweet little canvas I made recently using the beautiful, luscious contents of this month's Mixed Media Goody box from Artful Days. See here.
I loved the contents of last month's but I have to tell you, this month's is even better! As I explained in a previous post, Julie Bell has created these monthly Goody boxes, full of wonderfully, inspiring items for mixed media, scrapbooking, card making etc. She seeks out high quality, premium products that are a joy to work with. Each month follows a particular theme. This month's theme is: By The Sea. Oh you won't be disappointed if you are tempted to buy this one! You can buy individual boxes (£21.99 incl p&p) or take out a subscription: see website. The surprise element when opening the box to see what you've been given is irresistible! A wonderful monthly treat because we deserve it! Each box is beautifully packaged - you can also make use of the packaging, as I did on my little canvas.
 
   
Everything is safely and tantalisingly placed inside the box. A perfect balance of products to make several projects. So, how did I make my canvas? I started by adding a layer of gesso to the 7" X 5" canvas even though it is already well primed. I then added a coat of PaperArtsy Fresco chalk paint in China. This is a lovely opaque paint so I only needed one layer.
I chose this as it was close enough to the colour of the beautiful tissue that comes in plentiful supply, inside and outside the box.I then tore one of the tissue sheets into four pieces, scrunched them up before laying them flat and glued three of the pieces to the painted canvas once it had dried. I squished the tissue a little as I glued it to create some ridges for added texture. I used DecoArt matte medium for this. 
As you can see from the photo, I then smeared 'Forget Me Not' Archival ink across the surface to catch on the ridges. This gave a greeny/turquoise addition to the base colour. Just to add interest. Now to create the beach huts! 
I made a template for the beach huts and roof frame so that I could choose different papers from the generous selection of Graphic 45, 6" x 6" squares supplied this month (12) to create them. At the same time, I cut a strip off one of the yellow/orange sheets to represent the sand and to 'ground' the beach huts so they weren't floating across the canvas!  I then cut a strip of the jute/burlap, also included this month, frayed the edges and adhered this on top of the yellow strip.  Now, the fun part. Lots of cutting and gluing to create three little beach huts. So cute! 
I used some of the trimmings to create the flags hanging from pieces of the turquoise string  which I unraveled as it was rather too thick for bunting! Now I was almost done. It only needed embellishing with just a few of the gorgeous charms, shells, sequins, gems and other ephemera that comes with each Goody box and it was finished. 
And I still have a huge amount left over for my next few projects. Watch this space! If you love the look of these products hop over here to find out how you can order your very own. 
Thanks for popping by and keep an eye out for more blog posts from Julie and the team Here.


Wednesday 10 August 2016

PaperArtsy Blog Post: Pattern Making

Hi everyone, I'm linking this post to the PA blogpost on Pattern Making tonight - here. I was so pleased when Darcy asked if I would like to take part in this fortnight's theme. It has such a wide scope but creating patterns and doodles is something I love to do and using Emma Godfrey's gorgeous stamps (EEG17 and EM 24 - see photo below) which lend themselves so completely to pattern making, was an opportunity I didn't want to miss. I just had to decide on what to create. I had plenty of time to think and play and this was the result of all that thinking!
I wanted to make a gift set of wrapping paper, greetings card and tag, so I knew I was heading towards making a masterboard using the Gelli plate. I had a lot of fun playing with all my favourite Fresco Chalks on the Gelli plate, using a Birgit Koopsen technique of stamping into the paint to create patterns and designs before taking off a print.

I played around with lots of colours, making lots of gorgeous prints and patterns (which I was able to use later) but finally decided on this combination: Bougainvillea and Captain Peacock - what else!
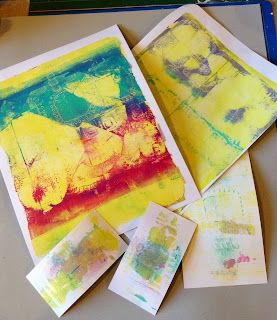
Here are some of the prints I pulled which I made into various greetings cards and tags.

During the 'Play' stage of this project I spent a wonderful day with my daughter and two little Grandfairies in the Cotswolds, at Bourton on the Water. We ended the day with a 'fish and chips' supper in the garden of a lovely little cafĂ© where our bread was served in a small, white, take-away box. Ever watchful for a craft product, I seized this box realising it would make a perfect gift box for mini cakes or cookies. Perfect for this project! So, on my return, I set about deconstructing the box in order to transfer the stamped pattern from the Gelli plate onto the outside of the box. No easy feat, I can tell you. but, I persevered and voila!
I didn't mind that there were some white spaces where the paint didn't quite catch as I'm not very good at leaving white space on a project so I was pleased with this serendipitous result. Now, in order to bring the stamped pattern forward, I used Ranger black Archival ink to overstamp the larger of the stamped images.
Further stamping and embellishing with a white, uniball signo pen completed the design on the outside of the box.
I painted the reverse completely with Captain Peacock, used Ranger Blue/Violet Archival and a mix of Emma's stamp sets to create a repeated pattern to decorate what would become the inside of the box. 
Now I had only to reassemble the box for this part of the set to be complete.

I used the masterboards I had previously created on the Gelli plate to make a Greetings card and tag and the Gift set was complete.
Some raspberry cookies, pink tissue paper and coloured wool was all I needed then for the gift to be ready for a friend who despite being unwell hosted a lovely barbeque recently. I had great fun creating lots more cards and tags for my 'stand-by drawer' and still have lots left over for art journaling and ATCs.
These are the stamps and paints I used for the final projects. Thankyou so much for dropping by. I do hope you will have a go with this Gelli plate technique for creating patterns and of course use Emma's gorgeous stamps at the same time!
Now I need to decide what to do with these beauties created when I cleaned the brayer as I switched colours. Delicious.

Bye for now and happy crafting!