Words I will journal by.

Create. Learn. Try. Believe you can.

Thursday 18 May 2017

A Rare Bit of Colour!

Hi everyone,
Throughout a dismal, grey, dreich week, I've been playing with some of the gorgeous products inside the new Mixed-Media Goodie box for May, from Artful Days. The theme for this box is: Summer Colours. As soon as I opened the box I knew that I wanted to create a Scrapbook page for the photo I have of my newest little Grandfairy and I knew her smiling eyes would light up the page.
 
The contents of this month's Goodie box, as always, is so inspiring. I'm already planning the little canvas I want to create next! 
It's always an exciting moment when I open each of the Goodie boxes. Julie Bell finds the most delicious, top quality products. There is always such a lovely variety. And always a surprise item! Last month - that delicious feather stencil and this time, a wonderful mica spray! I had fun creating the background for my scrapbook page with that! 

But first, I started spraying through a Large stencil onto a white 30cm X 30cm square 350gms card, using a Prima Colour Bloom spray. Then, when dry, I lightly sprayed across the card with the pink mica spray in the Goodie box. These photos don't fairly show the gorgeous shimmer from both sprays. 
I added more once I'd assembled the page, but this was a delicious start. 
The papers this month are from: First Edition. Thecolours are bright and summery as the box title indicates. Just my colours. So, I assembled some of the products that I planned to use on the page. I mounted the photo of the baby onto a couple of sheets from the box. 4 of the papers are specially coated, all the rest are double-sided. 
And so, I started playing! I cut some tags from some of the papers and linked them with some of the pink twine in the box. There are several colours of twine included. Once I'd placed the photo where I wanted it, it was just a case of positioning other embellishments around it.
I only needed to add paint, some wooden numbers and a couple of die cuts from my own stash to complete the page. Everything else is from this month's Goodie box. I hope you like it and if you are interested in finding out more about Julie Bell's Goodie boxes, you will find her website here: www.artfuldays.co.uk
Until next time! 

Thursday 11 May 2017

Dreams - Artful Days April Goodie Box

Hi there everyone,
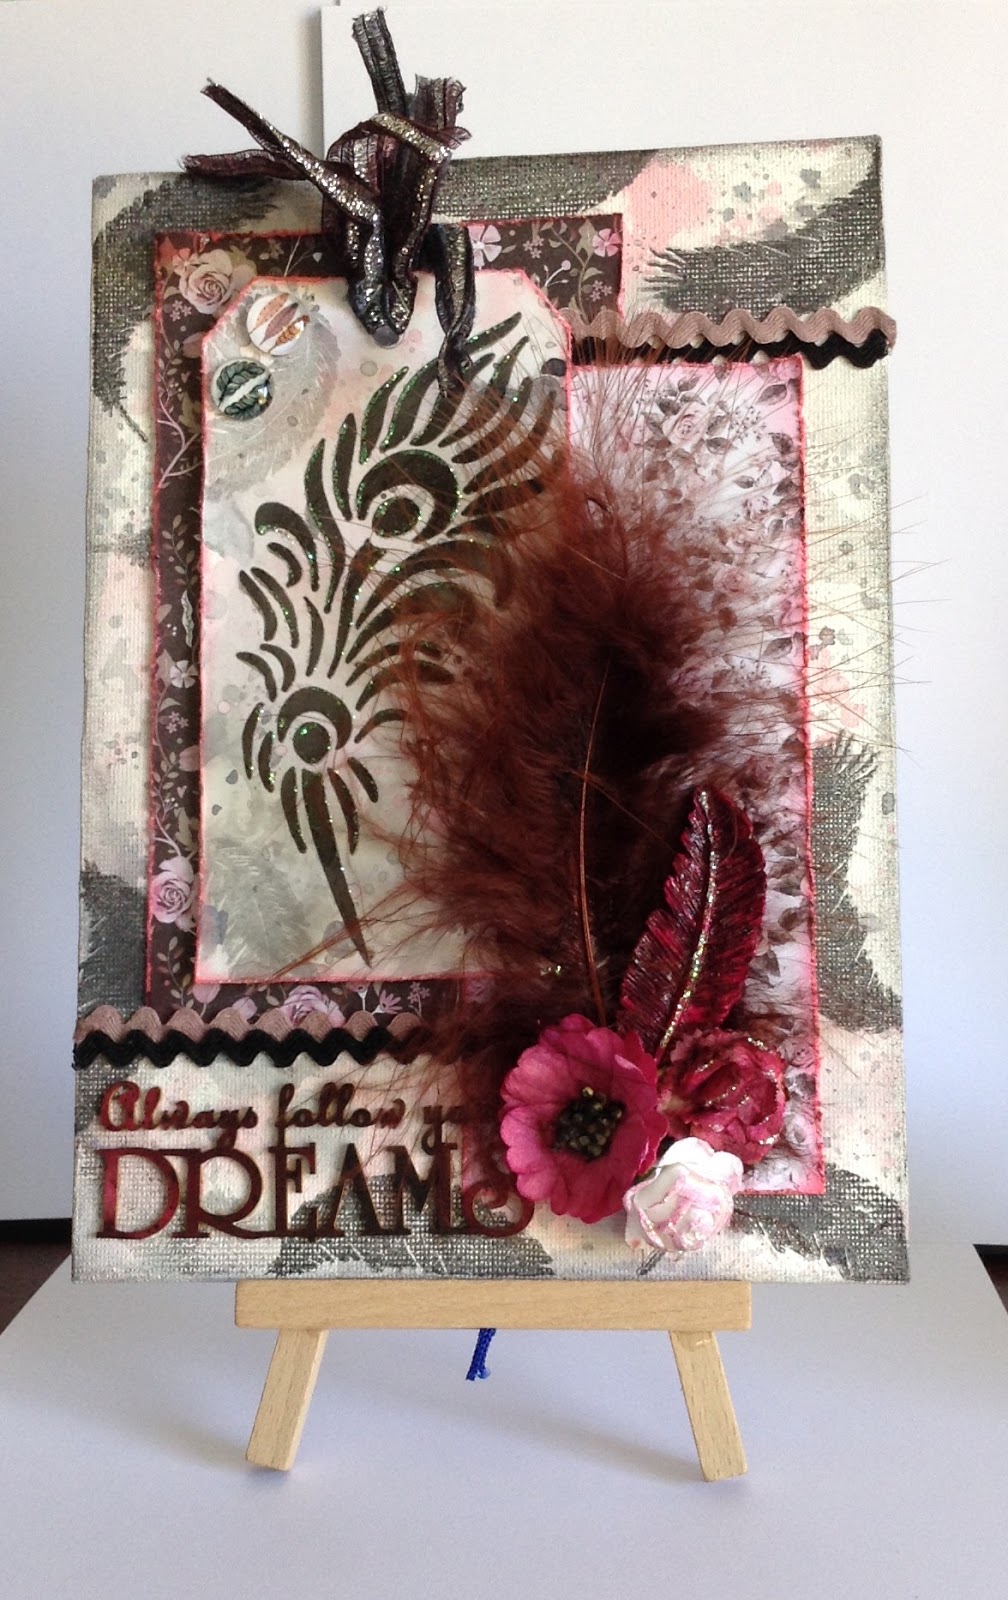
I'm back tonight with a couple of projects that I have really enjoyed making, using last month's wonderful items from the April Goodie Box. The theme for April is: Dreams. It's certainly well named. The products are very 'dreamy'. I'm absolutely in love with the stencil that Julie Bell included in this selection. It is so versatile! As you will see. Here's the first project: A 7" X 5" canvas.

For the canvas I was inspired by the beautiful papers included in this month's selection. These are the new Prima Rose Quartz papers and journaling papers. The colours are mainly greys and pinks so those were the colours I wanted to play around with. I also wanted to use the new Ranger Distress Oxides to create a splattered background. After a bit of experimentation I ended up with a mix of Worn Lipstick in the oxides and Pumice Stone and Black Soot in the original Distress inks. They do blend beautifully and I was really pleased with the outcomes. I think I managed to re-create the colours in the papers quite well. What do you think? 
Before making the background on the canvas, I used the same technique on a 7" X 5" piece of Mixed Media card from Inkylicious. These take a lot of wet media without buckling. It was certainly easier to swoosh the card through the inks (that were smeared on the work mat first before a light spraying of water/TH method) than it was to swoosh the canvas that obviously has no 'give'. But somehow, it worked first time and I was really pleased with the result. 
So, first up: the Worn Lipstick Oxide, swooshed two or three times and dried between. I'm getting the hang of these now! 
Now I added the Distress ink: Pumice Stone on top of the Oxide, again drying in between. This drying helps to keep the background clean, and look!!! White space! Me? Wow. 
And just a very gentle touch of Black Soot Distress Ink. I really love this background and this blend of colours. Now to play with that fabulous feather stencil! 
Gosh, I had fun with this. I decided to use PaperArtsy Infusions: 'Are You Cerise' and Black Knight' and mixed them carefully with a dab of Golden's Heavy Matte Gel. I then pushed these blends through the stencil and left them to dry. I made several of these as I loved the results. I'm sure I can make some cards and tags with these. The ones I wanted to use for this canvas, however, were those I stencilled onto the mixed media card background. I did one of each colour as I hadn't yet made up my mind which I would use for the canvas. I secretly wanted to use the pink feather but in the end the dark grey one was the better fit for this project. Never mind, I had another plan for the pink one! 
It's interesting to note (and has already been said by my lovely chum, Lesley Ebdon) that by mixing the Infusions in with the gel, you tend to lose the lovely 'walnut' crystals, but you do get a beautiful, vibrant colour instead. I was happy with that. 
Next, I coloured a couple of the embellishments that I would use when I assembled all the different bits. I adore the Scrapiniec words that Julie nearly always includes in each month's goodie box and the resin feathers are gorgeous. You get four of these! 
I cut down the Mixed Media card to create two tags with each of the stencilled feathers. I added some complementary ribbon and inked the edges. Luckily, I had a stamp set by Visible Image that had some cute feather stamps on, so I stamped around the tag with a second stamping of Pumice Stone. Now it was time to assemble everything, ink all edges and prepare to layer. I used a couple of the gorgeous papers for layering. 
And yes, that little bottle of Ranger a matte medium is included in this month's box. Julie thinks of everything. Definitely useful for gluing these layers down. The feather is one of many included this month, in the deepest burgundy and also in pure white. They are absolutely delicious! The ric-rac is from my stash. 
With the addition of a couple of the gorgeous Mulberry flowers and a couple of the cabochons, plus some Rangers Crystal stickles to add a bit of sparkle, it was finished! And I love it. But what happened to the pink stencilled feather? This...
You can see now just how useful that stencil is. A close up to finish I hope you've enjoyed this post. I really enjoyed creating these projects. If you are tempted by these goodies, you'll find more inspiration and details how you can buy yours, here. Until next time! Happy crafting one and all! 


Friday 5 May 2017

'Found Objects' art journaling

Evening all,
Tonight I'm blogging my entry for the current PA challenge: Found Ojects. You can see more projects on this topic here: Paperartsy

I love this topic because it is so appropriate for art journaling. Not only am I always on the look out for any bits and pieces I can use for 'Mark making' on my journal pages, but my husband is always turning up odd items from the garage and my granddaughters save all sorts of scraps for me! I have a huge box full of all sorts of odd, throw-away items that can add creative layers to my journal pages. Here are the items I decided to use for this project:
I cannot bring myself to throw away a cat food carton. The cardboard is wonderful to journal on and this is what I used as my substrate for this project. If any of you have bought Kate Crane's excellent online class: Journal Soup - Here -  you will know why I blame her for all of this hoarding! 
As I took lots of photos depicting the process of this project, I should let the photos do the talking. It goes without saying that I used Fresco Chalk paints for the journal background but all stencilling and mark making was as a result of the various 'Found objects' that were in my box of 'Finds'. Some worked better than others. See what you think! 

My first paint choices, although I did add other colours as I went on. Yummy. You can see I have gessoed the cardboard cut from the Cat Food box - 5 1/2" x 7 1/2". 

First layer. Love how you can still see the corrugations through the brayered paint. I'm not very good at leaving white space in my journaling so working on cardboard naturally leaves white areas. A plus point for me. 

Now for some essential stencilling tools! And yes, that is the scoop from the cat litter tray. Thoroughly cleaned of course. The fine red mesh originally held M & S oranges. It worked beautifully as a stencil. 

This worked well too. 

The other plastic mesh embroidery tools were too thick to make much impression with paint but were  very useful for a bit of modelling paste. Unfortunately, my grunge paste has hardened! 

The cat scoop was less successful as a stencil...

The large bougainvillea circles were created with good old bubble wrap. Once the modelling paste had dried I was able to add more paint layers. Then...

...a few Mark-making tools. I had great fun with some of these! Not all made much impression though.
Kate Crane got me addicted to using odd bits of Lego. I do feel a bit guilty when I see the grandfairies despairing over a lost piece of vital Lego from building a princess palace. Whoops! They now know to go hunting in the 'Finds box'. I have no idea what that black spatula type of thing is. Possibly a salad server? But it makes great dotted lines! 
Now these strange tools made some fabulous 'marks'. The long, black plastic tube thing once held some tiny plug plants. I couldn't throw that away. And look at the wonderful marks it made with Little Black Dress, Fresco chalk paint! The cardboard mini tubes were dropped on my craft table by my OH, saying "Can you make use of these?". Oh yes! The coffee stirrer made fabulous little marks too. Who hasn't got a coffee stirrer in their stash? Love how it's coming together and not a bought stencil anywhere near it! Frugal crafting or what? 

Now to create the focal point. I'm an avid collector of tags. A lot are garment tags or from the shoes I buy. I decided to use one of the little monsters from elenazinski Art ZA02 and collage a dress from a bit of one of the tags as a contrast to the background colours. I then cut out some bunting from some cardboard left overs in the cat box again and paint it with a similar colour to the cut out dress.

And there we are. A final touch of 'Treasure Gold' on the bunting and raised, modelling paste areas, and it was finished! I do hope you like it and perhaps might be tempted to find your own 'Found Objects' to create an art journal page. Thankyou so much for dropping by. I would value your opinion! Until next time...

Do you recognise the quote? It's from: "It's a Wonderful Life".